Every year, it seems that the internet gets just a little more filled with ads. For many years I’ve had several ad-blocking extensions installed in my browser, but they’re constantly engaged in an arms race against site maintainers. As a notable example, YouTube recently began cracking down on ad-blocking extensions, rendering many of them ineffective in an effort to push YouTube premium. While DNS blockers like Pi-hole don’t address YouTube ads, adding one to my home network has been a back-burner project on my mind for a while. Here’s what the experience looks like as of June 2024, including how to get around a couple of wrinkles I faced.
DNS Sinkholes
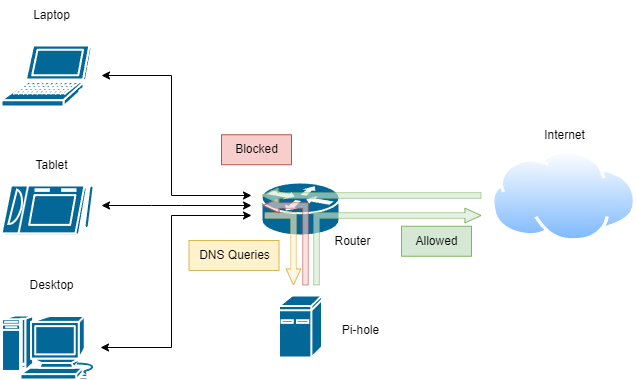
Pi-hole works as a DNS sinkhole. When a computer on a network wants to load website from a domain (e.g. www.google.com), it asks a DNS server to resolve the domain to an IP address. The computer can then query the IP directly to load the content. Domain names were created so that people could remember and share site names rather than the IP addresses themselves, which are not very human readable. The DNS server is hosted somewhere on the internet, and acts like a phonebook, looking up the number for each name requested.
A DNS sinkhole is a filter set before the upstream DNS server is queried. It uses a blocklist of known ad sites, and intercepts DNS lookups before they are sent out. Lookups for known ad domains are returned unresolved, and the rest are passed on. The approach is flexible and simple. The blocklist can be continually updated, and ads are blocked by never being loaded in the first place. From the POV of the computer, it looks like the ad domains don’t exist, and from the DNS server upstream, requests for ad domains never arrive. The blocking is network wide, so anyone who joins your network will have the benefit of ad-free browsing without configuring any client-side ad blockers.
Raspberry Pi Setup
There are plenty of guides available for setting up a Raspberry Pi with Pi-hole, so I won’t make a new one here. I followed this guide which made the process simple, except for a few small notes:
→ Hard-wiring the Pi with an ethernet connection is recommended instead of a wireless setup, so there is no need to setup the wireless LAN connection. Any time wlan0 is referenced, just drop in eth0 instead to refer to the ethernet connection.
→ The guide suggests a Zero 2 W model, which works well for this project. However, you will likely not be able to $ sudo apt full-upgrade on this model without increasing the swap file size. The Zero 2 W only has 512MB of RAM, so the full upgrade will likely need to utilize swap to complete, and the default swap reservation is only 100MB. This guide shows how to increase the swap file size:
1) Turn off swap: sudo dphys-swapfile swapoff
2) Edit the swap config file: sudo nano /etc/dphys-swapfile
3) Find CONF_SWAPSIZE=100 and replace with e.g. CONF_SWAPSIZE=2048 to set 2 GB of swap
4) Exit nano, with CTRL + X, Y, ENTER
5) Setup swap: sudo dphys-swapfile setup
6) Turn on swap: sudo dphys-swapfile swapon
7) Reboot sudo reboot
The rest of the setup should be straightforward. You will need to be able to allocate a static IP for the Pi, but even ISP provided routers like the CR1000A Fios model that I have should allow this. If you have this router, the DNS lookup step is buried in the advanced settings. Look in Advanced -> Network Connections -> Broadband Connection (Ethernet) and click edit. Change the IPv4 DNS setting under WAN IP address to “Use the following IPv4 DNS Addresses” to the static IP for the Raspberry Pi for both addresses, or leave the second one blank1.
Setting up PiVPN for Wireguard
With these types of projects, once you start, it’s hard to stop. Once you have network-wide ad blocking setup, installing a VPN for your network is relatively straightforward and gives you ad-free browsing from anywhere. PiVPN is by far the simplest way to set this up, and works with Wireguard, a VPN provider for Raspberry Pi. This guide is an excellent walkthrough. Make sure to configure through eth0. Again, for the CR1000A router, you will have to setup the open port through Advanced -> Firewall -> Port Forwarding. Enter the IP and port chosen in the VPN setup.
Many home ISP providers no longer have the option of allocating a static IP, which complicates the VPN setup slightly. At the relevant step, make sure to select “DNS Entry” to connect to the VPN server rather than a Public IP. The next step requires you to enter the DNS name. For this, use Duckdns to register a Dynamic DNS service. Other services are available but most require payment or monthly logins to remain active. The final step is to install the DDNS script on the Raspberry Pi. Duckdns provides a guide to do this. This guide suggests using vi to edit the duck.sh script file, which is run every 5 minutes by cron to make sure the dynamic IP is tracked correctly. It’s just as easy to use another editor, like nano, to do this instead, if vi is a bit beyond your comfort zone (as it is for me).
After all this setup, the last thing to do is to add Wireguard to a client computer. I installed the app on my phone and setup the VPN client with pivpn add. Even when using ssh, the setup will show a QR code which makes setup on the client app simple.
Conclusions
Setting up a network-wide DNS sinkhole was relatively straightforward using a Raspberry Pi and pi-hole. It was also not too difficult to set up Wireguard with PiVPN to extend the ad blocker for remote use. For anyone with a free Saturday afternoon, a Raspberry Pi, and a bit of basic IT knowledge, this project is a worthwhile undertaking to set up another filter against the barrage of ads on the internet today.
-
Ideally, you would have a second Raspberry Pi running another Pi-hole, in case the first one goes down. In the current configuration, if the Pi crashes the entire network would disconnect. ↩